Monday, October 28, 2013

Chocolate Peanut Butter Bars


I was watching my favorite show The Chew the other day and Allison Fishman Task had made these yummy chocolate peanut butter bars that everyone was going crazy for, and now I know why. They are suppose to be like a Reese's Peanut butter cup, but in a healthy less fat bar recipe. I couldn't believe how easy and so delicious these were. Give them a try you will love this recipe


Ingredients:

3/4 cup granulated sugar
3/4 cup light brown sugar
6 Tablespoons unsalted butter, I used salted butter
1 Tablespoon canola oil
3/4 cup creamy peanut butter
1 large egg
1 large egg white
1 cup flour
1 teaspoon baking powder
1/4 teaspoon salt
cooking spray
2/3 cup semi sweet chocolate chips ( i used 1cup, you can use more up to 2 cups for a thick layer of chocolate)


Directions:

1. Preheat oven to 350 degrees and lightly spray pan with cooking spray and set aside
2. In a large mixing bowl beat the granulated sugar, brown sugar, butter and oil. Mix until well combined.
3. Add the peanut butter, mix well, add the egg and egg white, mix until combined.
4. In a small bowl whisk the flour, baking soda and salt
5. Add the dry ingredients to the peanut butter mixture and beat on medium until combined
6. Pour into the prepared pan and bake for  26-28 minutes or until toothpick comes out clean.
7. Set aside to fully cool.
8. Melt the chocolate chips in a microwave bowl for about 1 minute or until smooth. Then after bars cooled pour melted chocolate over and smooth with offset spatula.
9. I place the pan in the refrigerator to let them set for about 15 minutes. Then cut into bars


Recipe from: The Chew: Allison Fishman Task


Chicken Soup


Now is the perfect weather to make a big pot of chicken soup. So if you have been following my blogs I think you now realize that I love the fall, as a matter of fact I am a little obsessed with it. I love the weather that it brings, the food, all of the holidays that are coming up. As a matter of fact my Christmas decorations go up November 1st. Why not right? I want to enjoy every minute of it, the stores are all decorated anyway!!! Now back to the soup, speaking of the fall now comes the colds and viruses, and what is the best medicine "chicken soup". This wonderful savory soup has the power to warm you right to the bone. There is something about chicken soup that is body and soul healing. The best part of chicken soup is that the possibilities are endless where you can add anything you have at home to the soup like any vegetables, herbs, canned tomatoes, egg or pasta noodles. Then top it off with crackers.


Ingredients:

1 large package of chicken on the bone( drumsticks,thighs, breasts) about 3 pounds
10 cups water
1 bag of carrots, chopped
3 stalks of celery, chopped
2 medium onions, finely diced
3 Tablespoons fresh parsley
1 bag frozen corn, or peas ( or you can use both)
1 can fire roasted tomatoes ( optional)
salt and pepper
1 box of small pasta ( i use stelline from barilla)


Directions:


1. In a large stock pot over medium heat add the water and the chicken, cook for about 2 hours
2. Remove the chicken, take the skin off and remove the bones, place just the meat back into the pot.
3. Add the carrots, celery, onions, parsley, corn and (peas if you like), salt and pepper and the can of tomatoes if you decide to use them.
4. Cook for 2 hours on low.
5. Meanwhile in another pot cook the pasta according to directions, then drain and set aside to put in the bottom of your bowl before adding the soup.
6. To serve place the pasta on the bottom of bowl, then add your soup..Enjoy!!!


Saturday, October 26, 2013

Caramel Apple Cupcakes


This is another great recipe to use your Granny Smith apples. After I made these a few weeks ago, it quickly was at our favorite list of cupcakes. With the cinnamon in the cake mix, along with the tart apples and delicious caramel buttercream frosting. The flavor is just a perfect match..These will nt disappoint you..They will soon become a favorite, I promise!!!


Ingredients:

Apple Cake:
1 box white cake mix
2 tsp. cinnamon 
3 eggs
¼ C. butter, melted and cooled
¼ C applesauce
1 C. milk
1 tsp. vanilla extract
1 ½ C. peeled and chopped Granny Smith apple
Caramel Buttercream:
1 C. butter, softened
2 Tbsp. caramel sauce in a jar ( for ice cream topping)
1 tsp vanilla extract
3-4 C. powdered sugar
Caramel sauce for topping

Directions:
1. Preheat oven to 350 degrees and line pans with cupcake liners.
2. Sift cake mix and cinnamon in to a small bowl and set aside.
3. In a large bowl, combine eggs, butter, applesauce, milk and vanilla extract together.
4. Stir in cake mix until smooth.
5. Stir in chopped apples.
6. Fill cupcake liners almost full and bake for 17-22 minutes of until an inserted knife comes out clean.
7. Buttercream: Beat butter for 1 minute. Add caramel and vanilla extract and continue to beat. Slowly add powdered sugar until you reach your desired consistency.

8. Pipe buttercream onto cooled cupcakes and top with melted caramel.


recipe from: yourcupofcake

Caramel Apples


I love this time of year with all of the yummy recipes using all of the apples that we picked. One of our favorites is the caramel apple, everyone loves caramel and then there are so many toppings that your family can choose from. Here I used mini m&m's, reese's peanut butter cups, mini chocolate chips, sprinkles and crushed peanuts. The recipe couldn't be an easier.


Ingredients:

2 bags individually wrapped caramels
4 Tablespoons water
12-15 small to medium granny smith apples
parchment paper
cooking spray
sticks
Your favorite toppings: m&m's, mini chocolate chips, white chips, oreos, sprinkles, reese peanut butter cups, butterfinger bars, peanuts, or any of your favorites.


Instructions:

1. Wash and dry apples thoroughly, then remove the stems and set aside
2. Place a stick in the center of the apples
3. Place 2 large sheets of parchment on counter and spray with cooking spray lightly
4. Prepare all of your toppings in small bowls, it will be easier if you prep everything because once the caramel is on the apples it dries quickly.
5. Remove caramel from the wrappers and place in a large microwave bowl with the water and on high, microwave for about 2 minutes stirring half way through
6. Dip the apples in the caramel, then place the toppings on, place on parchment to dry.


Friday, October 25, 2013

Frosted Sugar Cookies With Vanilla Frosting


I love cookies, but my all time favorite are sugar cookies. You can frost them for any holiday, birthday, and parties. This to me is the perfect sugar cookies, they are soft and fluffy due to the fact of adding the cake flour and the cornstarch. A lot of time people do not have cake flour around the house but believe me, it is worth a trip to the store to buy the flour for these cookies. They will melt in your mouth, then adding the most amazing vanilla frosting just makes these cookies over the top. This will become your favorite cookie I promise you that!!!Enjoy..


Ingredients:

2 1/2 cups cake flour
2 teaspoons cornstarch
1 1/2 teaspoons baking powder
1/4 teaspoon salt
1/2 cup softened butter
1/4 cup vegetable shortening
1 cup granulated sugar
1 large egg
1 egg white
2 1/2 teaspoons vanilla extract


Vanilla Frosting Recipe:

1/3 cup butter, softened
2 1/2 cups powdered sugar
1/2 teaspoon vanilla extract
2 1/2-3 Tablespoons heavy cream or half and half


Instructions For Cookies:


1. In a large bowl sift flour, cornstarch and salt then set aside.
2. In a large mixing bowl on medium speed add the butter, shortening and sugar and beat about 4 minutes or until it is pale and fluffy. Scraping the sides of the bowl every minute.
3. Add in the egg, mix until combined, then add the egg white and vanilla and mix again until combined.
4. Turn the mixer on low and add the dry ingredients and mix until just combined.
5. Remove the dough from the mixer and wrap in a ball, then wrap in plastic and refrigerate for about 2 hours.
6. Preheat oven to 375 degrees and line 2 cookie sheets with parchment paper
7. Remove dough and if it is a little hard to roll just let it sit on counter for abut 10 minutes or until it is easy enough to roll out.
8. Take some dough with your hands and roll into a ball making it about 1/2 inch thick, then place on the prepared cookie sheet and flatten slightly with your hand or the bottom of a cup.
9. Bake for 9-11 minutes. I do not let them get brown at all.
10. Let cool on cookie sheet for 5 minutes then transfer to a wire rack to cool completely before frosting them.

For The Frosting:

1. In a mixing bowl combine the all of the ingredients for the frosting and beat on high until it becomes smooth and fluffy. It may take 2-3 minutes.
2. After the cookies are completely cooled frost then place sprinkles on right away so they stick to the frosting.


adapted from:cookingclassy.com


Thursday, October 24, 2013

Butternut Squash And Lasagna Rolls


These lasagna rolls are stuffed with a delicious mixture of spinach and cheese, then topped with a creamy butternut squash sauce.In my home my family loves lasagna, and I am always trying to find new recipes to change it up each season. This recipe is so good with the addition of the butternut squash sauce. Perfect for this time of year and would be a great dish to go on to your dinner table for Thanksgiving along with your ham and turkey. It is also a very easy dish to make during the week, you can prepare in the morning and bake it just before your ready to eat.


Ingredients:

1 box lasagna noodles
1 butternut squash (about 2-3 pounds)
12 ounce package of chopped spinach, cooked and squeezed dry
12 ounce mozzarella cheese, grated
15 ounce container of ricotta cheese
2 Tablespoons olive oil
1 small shallot, diced
1 garlic clove, diced
1 large egg
salt and pepper to taste


Instructions:

1. In a large pot heat water to boiling, then add the lasagna noodles and cook for 3 minutes less than what the directions say on the box. Drain noodles, lay out on a piece of wax paper separately so they do not stick. I do run a little cold water over the noodles, then I dry each one with a paper towel. Then set aside
2. Cut the butternut squash into quarters, peel, then dice into about 2 inch cubes. In a large pot of salted water add the squash and cook for about 20-25 minutes or until they become fork tender. Drain the squash, reserving 2 cups of the liquid to thin out the sauce if needed.
3. Place the cooked squash in a blender and puree until smooth, add 1 cup of the liquid to thin out a little bit. If to thick still you can add a little more. ( you want it like the consistency of a tomato sauce)
4. Meanwhile in a medium saute pan, heat olive oil and add the shallot and garlic saute just until soft, add the butternut squash puree, and salt and pepper. Set aside.
5. In a large bowl add the ricotta cheese, 1 egg, spinach, and a dash of salt and pepper.
6. For the assembly: In a 13x9 inch dish place half of the butternut squash sauce. Then lay out the lasagna noodles on a piece of wax paper, make sure they are dry, spread 1/3 of a cup of the ricotta and spinach mixture over the noodles and roll carefully then place in the dish seam side down. Repeat with the remaining noodles. After all of the noodles are in the dish, cover them with the rest of the butternut squash sauce. Cover tightly with foil and bake for 40 minutes. Take the foil off and top with the mozzarella cheese and bake for 15-20 minutes or until the cheese becomes bubbly and lightly brown. Remove from the oven and let stand for about 15 minutes to set. Enjoy!!!!!

Wednesday, October 23, 2013

White Cheddar Homemade Cheez It's


Well I am a true Cheez It lover. Then when I came across these, I cannot believe how easy, good and taste better than the real thing. You can use white,yellow, jack with jalapeño, or your favorite cheese. But I only made with the white cheddar, so I can promise you will like the white. Give them a try!!!


Ingredients:

1 ( 8 ounce block of sharp white cheddar cheese) grated
4 Tablespoons butter, softened
1 cup all purpose flour
1/2 teaspoon salt
4-5 Tablespoons ice water


Directions: 

1. In a large mixing bowl combine the cheese, 1/4 teaspoon salt, and the softened butter. You can use a spatula to combine.  
2. With a paddle attachment to a stand mixer or a hand mixer add the flour to the cheese mixture and on low speed mix until becomes large clumps. Then keeping the mixer on low, slowly add the ice water until soft dough forms.
3. Take the dough out of the mixer, divide in half, and shape into a disc. Place the 2 pieces f dough discs in plastic wrap and place in refrigerator for about 1 hour.
4. Preheat oven to 375 degrees and place parchment paper onto large cookie sheets.
5. On a slightly floured surface, using a rolling pin, roll the dough into a square about 1/8 of an inch, ten with a fluted pastry cutter cut the dough into 1 inch squares.
6. Place on prepared cookie sheets, In the center of each square make a small hole with a toothpick. Then sprinkle with the rest of the salt and bake for 7-10 minutes. Until sides become a little brown and they become puffy. Serve right away or you can store in a airtight container. Enjoy!!!


Adapted From:shopgirlmaria.blogspot.com


Monday, October 21, 2013

Whoopie Pies


On Saturday my husband took me to one of my favorite places, Lancaster, PA to Amish Country for our Anniversary. I just love to go there several times a year. I stock up on all of my baking items and spices. I go to the Amish farms and talk to the women about several different things, one of them being they way that they bake. I love the cinnamon rolls, whoopie pies, the cinnamon raisin bread, apple fritters, etc. That made me want to come home and make my whoopie pies. I love this recipe, this one I got from my sister in law that has been making them for years, several years ago I asked her for the recipe and now my whole family loves these. They are gone in the blink of an eye. Try them, believe me you will love this recipe..

Ingredients For Whoopie Pies:

1 2/3 cups all purpose flour
2/3 cup of unsweetened cocoa powder
1 1/2 teaspoons baking soda
1/2 teaspoon salt
4 Tablespoons, butter (room temperature)
4 Tablespoons shortening
1 cup packed dark brown sugar
1 egg
1 teaspoon vanilla
1 cup milk


Ingredients For the Filling:

4 ounce cream cheese, softened
4 Tablespoons butter, softened
3 1/2 cups powdered sugar
1 teaspoon vanilla


Directions For The Whoopie Pies:

1. Preheat oven to 375 degrees and place rack in the middle of the oven
2. In a medium bowl sift flour, cocoa powder, baking soda, and salt. Set aside
3. In a large mixing bowl beat the butter, shortening, and brown sugar until light and fluffy, for 3 minutes. Add the egg and vanilla and beat for another 2 minutes
4. Add half the milk and half the dry ingredients and beat until incorporated. Scrape down the sides of the bowl. Add the remaining flour mixture and remaining milk and beat until completely combined.
5. Using a Tablespoon drop the batter onto baking sheets. Spacing 2 inches apart. Bake 1 sheet at a time for 10 minutes. Cool for 5 minutes before transferring to a cooling rack. Then cool completely.


For The Filling:

1. Beat cream cheese and butter on medium speed, until well combined. Slowly add the powdered sugar and vanilla. Beat until well combined.
2. When whoopie pies are completely cooled, scoop filling onto one side, then top with the other half, like a sandwich..


Friday, October 18, 2013

Creative Ways To Decorate Pumpkins

This pumpkin is covered in lace from your local fabric store, also you can buy cheap pantyhose for your smaller pumpkins. Just wrap the pumpkin with the lace, then on top make a pretty bow with the rest!!!!
Here are some more creative ideas for decorating your pumpkins this year!!!And they are easy and inexpensive ways to do them with items from your local craft store!!! So go and buy some pumpkins and have fun..
 For these cute little pumpkins you can use them indoors on a table, with candleholders on your counter. You just need glue, and corn husks. All you do is cut the corn husks to size and glue them to the pumpkin..Easy peasy..
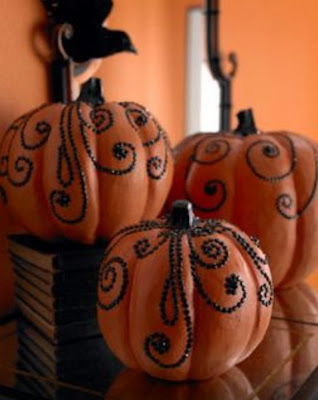
 These pumpkins are beautiful. All you need is glue,black paint for the core, and some black beads, then use your imagination to make it beautiful with your own patterns!!
 I think this is perfect for your front porch, all you need is sheer netting material and a few ribbons to make them look awesome.
 And how cool is this pumpkin painted in black and then the face cut out, and a candle inside. I just love the look with the black and the orange lit up inside.

 
And what a great idea. A monogramed pumpkin for the front of your home. You can buy a stencil or do it by hand. Place in a plant holder with some decorative berries


This is super cute for your kitchen, just buy some large stickers and place them in the middle of the pumpkin, then place a bow on top.
 This is a great idea for candle holders, Just buy some small pumpkins, paint them black, or a color of your choice and use them in place of a candle

How fun are these little white pumpkins, just buy some glue and glitter and decorate away!!

This one I love..Who would have thought you go buy some pretty ribbon of your choice and some glue, then decorate in an pattern you like...

Decorating Pumpkin Idea's


Are you going pumpkin picking this weekend? This idea is for my sister Sara, we are going apple and pumpkin picking Sunday, and I know she will love this idea!! A great idea to decorate your pumpkins for your front door. You can choose any color paint and ribbon to match your house.

What you will need:

Large, medium and small pumpkin
White paint from craft store as your base color
Brown paint from craft store for your stem
Any paint colors of your choice from your local craft store
Foam Brushes
Any ribbon of your choice


Paint your pumpkins white, you may need 2 coats, Let dry completely, then paint what ever shapes you would like on your pumpkin. Tie a ribbon on it. And put on your porch. Everyone will love this.


Halloween Muddy Mix


Here is another great recipe fast and easy Muddy/Puppy Chow recipe that is for Halloween parties or just to snack around the house.What makes this different is that I used the new S'mores candy corn, they are really good. For me this is the perfect snack to just sit, watch tv, and have a sweet treat. You can add anything else to this mix that your family enjoys!!


Ingredients:

8 cups rice chex cereal
2 cups semi sweet or milk chocolate chips, plus 1 Tablespoon shortening for melting
3/4 cup powdered sugar
3/4 cup brownie mix (from the box)
2 cups s'mores candy corn or you can use the regular candy corn
2 cups autumn colors milk chocolate M&M's
2 large plastic storage bags

Directions:

1. Place the chex cereal in a large bowl and set aside
2. In one of the large bags place the powdered sugar, in the other plastic bag place the brownie mix. Then break up the lumps with your fingers
3. In a small bowl place the chocolate chips and shortening in. The microwave for about 60-65 seconds, until all of the chocolate is melted
4. Pour the melted chocolate over the cereal and mix well until cereal is all coated
5. Then pour half into the bag of powdered sugar and half into brownie mix, seal the bag and shake, shake, shake, until all of the cereal is coated
6. Lay the cereal on a parchment lined cookie sheet until dried.
7. Add the M&M's and candy corn and place in a airtight container and enjoy!!!!


Recipe Adapted From: yourcupofcake


Thursday, October 17, 2013

Crumb Coffee Cake


This is a recipe that my Aunt Jane gave to me many years ago. And I have been making this coffee cake once a week since then. I will not go out to any supermarkets or bakeries to buy this because I feel this recipe is the best out there with all of the other million crumb coffee cake recipes out there. You can put a simple glaze on it, chocolate glaze, powdered sugar and even color the glaze for the holidays. Either way, I promise you that you will love it. It is super easy and stays in a airtight container for quite a while, unlike the store brands that get hard with in day or two. And I can't forget to bring over some to my best friend Jackie today because this is her favorite...Enjoy!!!


Ingredients For The Cake:

1 box butter recipe cake mix
2/3 cup vegetable oil
2/3 cup milk
4 eggs


Directions:

1. Preheat oven to 350 degrees. Then line with parchment paper or with cooking spray a large cookie sheet
2. In a stand or hand mixer combine all ingredients and mix until well combined. About 1-2 minutes on high
3. Place in the oven and bake for 18-20 minutes. Let cool for 5 minutes. Then follow the directions below.


Crumb Topping:
2 sticks melted margarine
1 stick melted butter
2 teaspoons vanilla extract
4 cups flour
3/4 cup packed light brown sugar
3/4 cup granulated sugar
2 teaspoons cinnamon

Directions:

1. In a medium microwave safe bowl place the 2 sticks of margarine and 1 stick of butter in microwave and melt for about 1-2 minutes, until melted, then add the vanilla
2. In a large bowl place flour, brown sugar, granulated sugar, and cinnamon. Stir until combined. Add the melted butter mixture to the flour mixture and with your hands combine mixture until it resembles coarse crumbs. Sprinkle all the crumbs evenly on the cake, patting it down gently, then place bake in the oven for 20 minutes. When completely cooled sprinkle powdered sugar on the top and cut into bars. Enjoy!!!!


Wednesday, October 16, 2013

Game Day Donuts


Well we are full force for the football season and how great are these cute little donuts that are dipped in a vanilla glaze, then decorated as a football. And did I tell you they are so good!!!!


Ingredients:

1 box of Pillsbury Funfetti Glazed Chocolate Lil Donut Kit
1/3 cup melted butter
1/2 cup milk
Glaze Packet ( that comes in the box)
3 Tablespoon milk ( for the glaze)
1/4 cup white chocolate chips


Directions:

1. Preheat oven to 375 degrees and place parchment paper on 2 large cookie sheets
2. In a large bowl combine the 1 pouch of chocolate donut mix, the melted butter and mix. With a large spoon stir the mixture until well combined.
3. Make dough balls the size of walnuts and roll tightly and place on the cookie sheet. Gently pinch the sides to make a football shape. Bake in the oven for 7-10 minutes. Remove from oven and let cool completely.
4. Meanwhile in a small bowl combine the glaze packet and 3 tablespoons milk, and with a fork or whisk, mix until combined.
5. After the donuts are completely cooled dip all sides into the vanilla glaze and place on a cooling rack until dried.
6. Place the white chocolate chips in a small microwave bowl and place in microwave and melt.
7. Take a small sandwich bag and place the melted white chocolate chips in the bag. Snip a little off the corner and pipe the threads on the footballs. And thats it..Enjoy!!!


RecipeFrom:yourcupofcake.com


Tuesday, October 15, 2013

Mini Pepper Nachos With Black Bean, Corn And Salsa


When I made this last night the family devoured them in 15 minutes. They are so delicious with the mini sweet peppers, corn, black bean and salsa. You can make these mild or as hot as you would like. They are super easy to make. But I promise you they will be gone before you know it!!!


Ingredients:

1 pound mini sweet peppers ( washed, sliced in half lengthwise, and remove seeds)
2/3 cup black beans
2/3 cup corn (fresh,frozen or canned)
1 avocado ,diced
2/3 cup your favorite salsa
salt and pepper to taste
2 cups shredded cheddar cheese ( If you want more cheese you can add more)
Scallions ( optional for on top)


Directions:

1. Place your oven on the broil setting
2. Place a piece of foil onto a large cookie sheet
3. In a large bowl combine the black beans, corn, avocado, salt and pepper, and salsa and stir until mixture is all combined
4. Place the mini peppers on cookie sheet
5. Using a teaspoon fill all the mini peppers with the filling. Then top with cheddar cheese
6. Place under the broiler for about 3-5 minutes until cheese is melted. Then top with scallions and enjoy!!!!


recipe from:closetcooking.com


Chocolate Football Cupcakes


Football Season is in full force. Aren't these cupcakes the perfect addition to your dessert table if you are having a party or to go tailgating. The cupcakes are super moist and delicious, along with the awesome frosting. Then top it off with colored coconut, which you can dye to your favorite teams color then add the super cute little chocolate cookie on top. These are adorable!!!!


Direction For The Chocolate Cupcakes:

The Chocolate Cake:

1 box devils food cake mix
3 eggs
1/2 cup of oil
1 cup of buttermilk
1/2 cup sour cream
1 1/2 teaspoons vanilla extract


Chocolate Buttercream:

1 cup  ( 2 sticks) butter, softened
1/2 cup of unsweetened cocoa powder
2 teaspoons vanilla
1 tablespoon of milk
2-2 1/2 cups powdered sugar

For the cake:

1. Preheat oven to 350 degrees. Line cupcake pan with 24 liners
2. Sift cake mix to remove any lumps
3. In a large bowl, combine eggs, oil, milk, sour cream and vanilla
4. Add the cake mix and blend until smooth about 1-2 minutes
5. Fill cupcake liners 3/4 full and bake for 17-22 minutes or until toothpick comes out clean

For the Buttercream:

6. Beat the butter for 2 minutes, add the vanilla, cocoa powder, and milk and beat again for 1 minute.
Slowly add the powdered sugar until you reach the desired consistency.
7. Pipe onto cooled cupcakes and decorate. Enjoy!!!


Ingredients For Decorating The Cupcakes:

1 bag of coconut
green food coloring

1. In a medium bowl add the coconut then add the food coloring to your desired color. You can do anyy color you like for your teams.
2. After the cupcakes cooled and you frosted them pile on the coconut 
3. Then decorate the chocolate football and place in the center of ach cupcake.

Ingredients For The Chocolate Football:

  • 1 egg
  • 3/4 cup sugar
  • 1/4 teaspoon salt
  • 1/2 teaspoon baking powder
  • 1/2 cup butter
  • 1 teaspoon vanilla extract
  • 1 1/2 cups all purpose flour
  • 1/3 cup Hersheys cocoa
  • 1/2 teaspoon baking soda


Directions


1. Beat butter, sugar, egg and vanilla in large bowl until blended. Stir together flour, cocoa, baking powder, baking soda and salt; add to butter mixture, beating until well blended. Cover; refrigerate dough about 1 hour or until firm enough to roll.
2. Heat oven to 325°F. On lightly floured board or between 2 pieces of wax paper, roll small portion of dough at a time to 1/4-inch thickness. Cut into desired shapes with cookie cutters; place on ungreased cookie sheet.
3. Bake 5 to 7 minutes or until no indentation remains when touched. lightly. Cool slightly; remove from cookie sheet to wire racks. Cool completely. 
Royal Icing For The Footballs:

4 Tablespoons Meringue Powder
4 Cups Powdered Sugar
6 Tablespoons warm water to start

1. Beat all ingredients until stiff peaks form.
2. This icing should be thick enough so when you decorate it will not run.
3. Place in a ziploc bag, snip very little off the tip, place icing in bag and make the football design


Chocolate cookie dough recipe from: Hersheys website

Chocolate Cupcake and frosting from:yourcupofcake


Monday, October 14, 2013

German Chocolate Pecan Pie Bars


Oh my, this is what I have to say about these bars. They are that good. The first person I thought of was my mom. She loves German Chocolate cake. I would have to say it is a combination of pecan pie bars and german chocolate cake. It is delicious goodness. They taste as good as they look. Give them a try, you will not be disappointed!!!


Ingredients:

3 cups of pecan halves
1 3/4 cups all purpose flour
3/4 cup powdered sugar
3/4 cup cold, cubed butter
1/4 cup unsweetened cocoa
1 1/2 cups semi sweet chocolate chips
3 large eggs
3/4 cup light brown sugar
3/4 cup light corn syrup
1/4 cup butter, melted
1 1/4 cup sweetened coconut


Directions:

1. Preheat oven to 350 degrees
2. Arrange pecans in a baking sheet and bake for 8-10 minutes or until lightly toasted, stirring halfway through
3. Meanwhile line a 13x9 inch baking pan with foil, leaving an overhang on two sides and grease the foil
4. In a medium bowl whisk the flour, powdered sugar and cocoa, add the cold butter and with pastry cutter or 2 knives combine the mix until it resembles a crumbly meal. Press the mixture into the 13x9 inch pan and go about 3/4 of the way up the pan. Bake the crust for 15 minutes
5. Remove the crust from the oven and immediately sprinkle the chocolate chips evenly over the crust.
6. Allow to cool for 30 minutes
7. In a small bowl add the eggs, beat lightly. Add the brown sugar, corn syrup, and melted butter and whisk together until smooth. Stir in the coconut and the pecans. Pour evenly over the crust and bake for 28-36 minutes or until golden brown.
8. Cool completely then place in refrigerator for 1 hour or until set.
9. With the 2 pieces of foil that are overhanging lift the bars and with a sharp knife cut into bars. Enjoy!!!


RecipeFrom:bakeorbreak.com


Sunday, October 13, 2013

Candy Corn Fruit Cups


My family happens to love pineapple, mandarin oranges and whipped cream. When I made these fruit cups I thought, perfect healthy snack to have on the table at a Halloween party. It is always yummy baked goods at every party, what about something healthy that everyone loves FRUIT. You can use small clear plastic cups for a party or large plastic cups for your family at home, anyway it is just a perfect idea that I came across this week and I love it. It is so darn easy that you don't really even need to follow a recipe. But I will give it to you anyway!!


Ingredients And Directions:

2 cans of pineapple chunks or tidbits ( 20 ounce)
3 cans of mandarin oranges ( 15 ounce)
1 can of whipped cream

1. In a clear or plastic cup, starting on the bottom, place the pineapples, then the oranges, then top it off with whipped cream. Then add 1 candy corn on the top for decoration..Place in the refrigerator until ready to serve, Then Enjoy!!!!!


recipe from:navywifecok.com


Chicken With Sun Dried Tomato And Basil Sauce


This chicken dish has to be one of my absolute favorite of all times. It is a cream sauce with basil and sun dried tomatoes and sometimes I don't like a cream sauce because it is to rich, but not this one, it is perfect. I know you will love this recipe just like my family does. Enjoy!!


Ingredients:

4 boneless, skinless, sliced lengthwise, and pounded somewhat on the thin side
1/4 cup olive oil
4 Tablespoons butter
salt and pepper to taste
4 Tablespoons flour
1/2 cup finely diced onions
4 garlic cloves, finely diced
1 small shallot, finely diced
1/2 cup sun dried tomatoes ( I used the ones packed in olive oil, but use whatever you have)
1/4 cup fresh basil, chopped
2 cups chicken broth
1 cup half and half
1 pound pasta or veggies on the side, or both


Instructions:

1. Preheat skillet to medium-high heat and add the olive oil
2. Sprinkle your chicken with salt and pepper and place in skillet on cook about 5 minutes on each side, or until no longer pink
3. Remove chicken when done and place on a plate and cover with foil to keep it warm.
4. Add the butter to the pan and if needed 1-2 Tablespons more of olive oil and add the onions, garlic, and shallot, and cook about 5 minutes until soft but not brown
5. Add the sundried tomatoes and cook for 5 minutes
6. Add the flour and whisk until smooth and no lumps, then add the chicken broth and keep whisking until smooth, then add the half and half and cook for about 5 minutes until it becomes a little thicker. ( if to thick add more chicken broth)
7. Add the chicken back in pan and with a large spoon cover the chicken with the sauce, then let simmer 5 minutes until chicken is warm.
8. Add the basil, then serve with what ever you like, you can serve over pasta, or serve it with veggies and a potato and rice. Enjoy!!!!


Adapted From:gabbiskitchen.com


Hot Cheesy Corn Dip


I love to have company over and make lots of appetizers. I am always trying to find new ones that everyone will enjoy. I tried this and loved it, simply addicting. The great thing about it is that during the summer when the corn is super sweet you use it fresh, but the rest of the year you can use canned and frozen corn. With the blend of the charred corn, the melted bubbly cheese and the kick with the jalapeño it came out perfect.


Ingredients:

2 Tablespoons butter ( divided)
2 cups of corn ( fresh, frozen, or canned)
1/2 cup red or yellow onion, diced
1/4 cup red bell pepper, diced
2 green onions, sliced
1 jalapeño, diced
1 garlic clove, chopped
1/4 cup mayonnaise
1/2 cup Monterey Jack cheese, shredded
1/2 cup Cheddar Cheese, shredded
Salt and Pepper, Cayenne Pepper to taste


Instructions: 

1. In a sauté pan over medium-high melt 1 tablespoon butter and sauté the corn until it starts to turn a golden brown about 5 minutes. Remove the corn and set aside.
2. In the same pan melt the other tablespoon of butter and add the green onion, jalapeño, and garlic and cook until only for 2-3 minutes
3. In a medium bowl combine the corn, onions, peppers, garlic, jalapeño, mayonnaise, cheeses, cayenne, salt and pepper, ( Reserve some of the cheese to put on top)
4. Pour into a baking dish ( I used a 9x9) and sprinkle with the rest of the cheese
5. Bake in a 350 degree oven until bubbling on the sides and golden brown on top about 15-20 minutes. Serve while warm with tortilla chips. Enjoy!!!


Recipe from:closetcooking.com


Amazing Halloween Bundt Cake Recipe


I love the Halloween Holiday. We love to dress up and have a party with the family. I go trick or treating with my niece and nephew, Gianna and Anthony, then we all come back to my house and I usually make chili and some appetizers and some desserts for the kids. This one is defiantly on the menu this year. After you make this you will be amazed how awesome this cake looks. It is super moist, and has chocolate and vanilla cake, so everyone will enjoy this. Make this one you guys will love it!!!


Ingredients:

1 box of white cake mix
1 box of devils food chocolate cake mix
Water, Eggs, and Vegetable Oil, ( what is needed for each cake mix)
Black, Purple, and Orange Food Coloring ( I used Wiltons)
1 (12 ounce container creamy vanilla frosting)


Directions:

1. Preheat oven to 325 degrees and generously grease a bundt cake pan, then set aside.
2. First make the white cake mix ( make according to the directions on the box)
3. With the white cake mix, pour the cake mix into 2 medium sized bowls and set aside
4. Make the chocolate cake mix ( make according to the directions on the box) and pour the chocolate cake mix into a large mixing bowl and set aside
5. With the 2 bowls of white cake mix. Then one bowl add the orange food coloring until you have reached the desired color. Then add the purple to the other bowl and mix until you have reached your desired color. I make then dark purple and dark orange. Now set these orange and purple bowls aside.
6. With the chocolate cake mix add the black food coloring until you have reached the desired color, then set aside.
7. Place 2/3 of the black cake mix into the bundt pan and then add all of the purple cake mix on top of the black (Don't mix or swirl) then the orange, then the rest of the black.
8. Bake for 30-35 minutes or until toothpick comes out clean. Let cool in pan until cake is completely
cooled. Then flip over onto a cake plate.


For The Frosting:

1. Take the container of frosting and separate evenly into 3 small bowls. Again add the black, orange and the purple to each bowl until you have reached desired colors.
2. Microwave each frosting on high for a few second until it is smooth enough to drizzle on the cake. I did for about 10 seconds. With a fork drizzle the black first, all over the cake in a back and forth pattern, then heat the purple and drizzle that, then heat the orange and drizzle that. Thats all..Enjoy!!


Recipe From:cookingwithsugar.com


Candy Corn Candle Holders


These candle holders are so cute and easy to make. You can use them standing alone in different areas in your home, or like I did by placing them on candle holders. I purchased everything from my local craft store.


Directions on how to make:


3 small terra cotta pots
small sponge paintbrushes
white, orange, and dark yellow paint
candles ( you can use real tea lights and fill the bottom with sand or rice, or you can use the fake candles

Using painters tape, section off the three areas that your putting the colors, or if you have a steady hand you do not need the tape. Paint the white on the top, then the orange, then the yellow. You will need 2 coats of the paint, just let it dry a few minutes in between. And thats all. Very easy , inexpensive way to decorate your home..


Friday, October 11, 2013

Greek Pasta Salad With Tortellini

Greek Pasta Salad With Tortellini


Who doesn't love a good pasta salad. Well I do, even in the winter, this is a yummy pasta salad with homemade Greek dressing. You can make this with a sandwich for dinner or it is hearty enough to have for a meal by itself. If you do not have tortellini you can also make this with bow tie pasta.

Ingredients:

2 pounds Tortellini
1/4 red onion, sliced thinly
1 pint grape tomatoes, sliced in half
2 cucumbers, skin on, sliced in quarters
1 can black olives, sliced in half
1-1 1/2 cups crumbled feta cheese

For The Dressing:

1 cup olive oil
1/4 cup red wine vinegar
3 Tablespoons freshly squeezed lemon juice
1 large garlic clove minced
3 teaspoons oregano
1 teaspoon dried basil
1/4 teaspoon salt
1/2 teaspoon pepper

Directions For the Dressing:

1. Combine the olive oil and the red wine vinegar and whisk until combined. Add the lemon juice, garlic clove, oregano, basil, salt, and the pepper. Place in a jar or small bowl with lid and shake vigorously until it all comes together. Place in the refrigerator until ready to use.


Directions For The Pasta Salad:

1. Cook the tortellini according to the package then drain and run cold water over it for 1 minute then add 2 Tablespoons olive oil, just so it doesn't stick
2. Add the onions, tomatoes, cucumbers, and olives, then stir gently
3. Pour the dressing over the pasta salad then sprinkle the feta cheese over the pasta salad and stir gently.
4. Pour into a bowl and refrigerate at least 1 hour then serve. Enjoy!!!


Thursday, October 10, 2013

Tips on Winterizing Your Chicken Coop And Caring For The Chickens


Giving your chickens a nice feeing of warm cooked oatmeal in the morning and cracked corn before bed gives them something to digest during the night keeping them warmer. And they do love these treats.
Just like humans, chickens can and do get bored and stir crazy, especially in the winter months. They love it when I hang a head of cabbage or romain lettuce on a string in the coop. They go wild pecking at it while it bobs around. It makes me feel happy that i am trying to do something for them to keep them busy.
If you are worried about your girls not having enough space in the coop, you can build a kind of cold frame or greenhouse addition to your coop, covering it in clear plastic. They will wander out into it and have a bit more space on nice days, and giving them needed time out of the coop.

In the coldest winter climates, you may find that breeds with large combs and wattles are prone to frostbite. To protect them, you can smear their combs and wattles with petroleum jelly. However, if your chickens do get frostbite, it is usually just the tips of the combs that are affected, and they don’t seem to be any worse for the wear - but it can look a little icky.
Chickens don’t like snow.Generally speaking, once temperatures are in the 20 degree F range, chickens (mine, anyway) won’t walk out onto snow. You can scatter hay or straw on the ground and this will make it more palatable for them. And I find when it’s in the low 30s, they don’t seem to mind walking on the snow as much.
Check the health of your birds. Any health issues will be exacerbated by the cold weather. Treat any ailments, keep waterers and feeders topped off so their immune systems are at their peak.

Check out Nutrena Feed, that is the brand I use for everything for my chickens.
Things to do:
Clean and disinfect feeders, waterers and perches
- Healthy birds require a clean environment. Wash away any microorganisms that have grown happy in the warm weather.
- Perches and laying boxes are often forgotten during cleaning. Birds spend a lot of time in these places and bacteria are plentiful! Don’t forget these spots.
Muck out and deep-bed your coop
- Remove the bedding you use in your coop and replace with a thick layer of pine shavings, sawdust or straw.
- Pile the bedding up against the walls or leave a few bales of straw in your coop so if you need to remove some bedding during the winter during cleaning, you don’t have to haul fresh bedding in.
- Piles of straw provide a warm place for chickens to cuddle through the coldest weather.
- Don’t forget to place straw or other bedding in the nesting boxes. Soft, dried grass makes a great (free!) nest that protects eggs from cracking.
Feed and supplement your birds correctly- Chickens need a source of calcium and protein all year, so don’t neglect providing oyster shells in winter.
- To stimulate the scratching instinct and keep birds entertained, provide scratch grains periodically.
- To beat boredom, consider adding a Scratch Block to the coop for a healthy distraction!
Check for drafts
- Drafts can cause respiratory problems and sickness in your flock.
- Check for drafts where your chickens roost and spend most of their time when in the coop.
- Make any repairs to your chickens’ house while the weather is still fair.
Set up any heat lamps and water heaters
-  Develop a plan so your chickens have access to fresh, unfrozen water 24 hours a day.
- Frozen water isn’t any fun. Set up your heating devices early so you’re prepared and safe.


Some of this Information is from : scoopfromthecoop.nutrenaworld.com

Cheesy Stuffed Pull Apart Bread


When I made this, I said to myself, this tastes even better than it looks. It is so easy and quick to make. Also you can stuff this bread with anything else you and your family would enjoy. This would be perfect for football games,parties, make it with family pizza night or just to have a snack at night.


Ingredients:

1 loaf of large wide bread
1 stick butter
1/8 cup olive oil
3 teaspoons minced white or red onion
3 garlic cloves, minced
1 Tablespoon dijon mustard
1 Tablespoon poppy seeds
3 Tablespoons minced parsley
12 ounce package mozzarella cheese ( shredded )


Directions:

1. Preheat oven to 300 degrees
2. Melt the butter in a microwave safe bowl for around 40-60 seconds
3. In a medium bowl combine melted butter, onion, garlic, dijon mustard, poppy seeds and parsley and mix until combined.
4. Make X shape cuts in the loaf ( cutting all the way down to almost the bottom)
5. Fill inside the cuts with the mix using a small spoon then all over the top, then stuff with the cubes of cheese
6. Place in the baking pan covered with foil for 10 minutes then remove foil and cook another 10 minutes without the foil. Enjoy!!!


Recipe adapted from: daydreamkitchen.com


Pumpkin Pie Spice Sugar Scrub


I love to use sugar scrubs, I keep them at my sink and in the shower. This one is perfect for washing your body and hands. This scrub exfoliates your body and makes it feel soft and silky. Along with the wonderful smell that it leaves on your skin.


Ingredients:

2 cups Brown Sugar
1 cup Granulated Sugar
2 Tablespoons Pumpkin Pie Spice
3/4 cup Vegetable Oil


Directions:

1. Place the sugars, and the pumpkin pie spice in a large bowl. Whisk until you see no more lumps
2. Add the vegetable oil and stir until combined.
3. Store in a mason jar.


Wednesday, October 9, 2013

Homemade Pizza


Guess what for dinner at our ouse tonight!!!Yes pizza. I usually make pizza on Fridays but I was just in the mood for it tonight. Once you make this pizza recipe you will not be ordering out as much anymore..I promise you!!! Enjoy..


This recipes makes 2 large pizzas or 2 medium

For the sauce:
  
2 cans favorite crushed tomato sauce ( 28 ounce)
1 bay leaf
1 teaspoon oregano
4 fresh basil leaves, thinly sliced
2 finely diced garlic cloves
salt and pepper
1 Tablespoon Parsley
Parmesan cheese for sprinkling on top of pizza

Directions:

Place all ingredients in a saucepan and cook for 15 minutes

Toppings:

3 ( 8 ounce bags shredded mozzarella cheese) 1 ( 8 ounce per pizza)
pepperoni, mushrooms, onions, etc. Your favorite toppings  


Ingredients:

1 package active dry yeast
1 teaspoon sugar
1 cup warm water
1 tablespoon kosher salt
Extra-virgin or regular olive oil
3 cups all purpose flour, plus more for dusting
Directions:


In the bowl of a standing electric mixer fitted with a dough hook, combine the yeast, sugar, and warm water; stir gently to dissolve. Let the mixture stand until the yeast comes alive and starts to foam, about 5 to 10 minutes.

Turn the mixer on low and add the salt and 2 tablespoons of olive oil. Add the flour, a little at a time, mixing at the lowest speed until all the flour has been incorporated. When the dough starts to come together, increase the speed to medium.Get a feel for the dough by squeezing a small amount together: if it's crumbly, add more water; if it's sticky, add more flour - 1 tablespoon at a time. Mix until the dough gathers into a ball, this should take about 5 minutes.

Turn the dough out onto a lightly floured surface and fold it over itself a few times; kneading until it's smooth and elastic. Form the dough into a round and place in a lightly oiled bowl, turn it over to coat. Cover with plastic wrap or a damp towel and let it rise in a warm spot (i.e. over a gas pilot light) until doubled in size, about 1 hour. 

Once the dough is ready turn it out onto a lightly floured counter. Roll and stretch the dough and divide into 3 equal pieces. Cover and let rest for 10 minutes so it will be easier to roll out.

Roll or pat out a piece of dough into a 12 inch circle, I like mine thin, you can make as thin or thick as you desire.Dust a pizza paddle with flour and slide it under the pizza dough. Brush the crust with a thin layer of olive oil, and place in a 500 degree oven for just 3 minutes just to cook the crust a little bit. Watch for bubbles, if you see any, pierce with a fork .Take out of the oven and layer the sauce, cheese and any toppings you desire.Then put back on pizza stone for 7-10 minutes depending on how crisp you like your pizza.


Dough Recipe Adapted From: Tyler Florence on Food Network


Tuesday, October 8, 2013

Strawberry And Angel Food Cake Skewers


This is a super easy and delicious dessert to put out on your table for any day of the week, unexpected company, or for a large gathering. You can make this cake from scratch or like I did, go out and buy the angel food cake.


Ingredients:

1 pound of  Strawberries (washed and stem removed)
1 store bought Angel Food Cake
1 cup of chocolate chips plus 1 Tablespoon shortening for melting
Skewers


Directions:

1. Wash and remove stems from strawberries
2. Cut angel food cake into about 2 inch cubes
3. Place the strawberries and angel food cake into the skewers and lay them on a platter
4. Place chocolate chips and shortening in a microwave bowl and heat for 40-60 seconds, stirring after 40 seconds.
5. Drizzle the melted chocolate all over the skewers with a fork, and thats it.. Enjoy!!!!